• If you haven't done so already, please add a location to your profile. This helps when people are trying to assist you, suggest resources, etc. Thanks
  • We're having a little contest, running until 15th May. Please feel free to enter - see the thread in the "I Did That" section of the forum. Don't be shy, have a go!

Scandalli bass problem. Need advice.

32251

Active member
Joined
Nov 9, 2023
Messages
130
Reaction score
222
Location
Lilburn ga 30047 usa
Have a very nice condition Scandalli accordion. Working on the bass side. Buttons were all pushed in and I could hear light rattling when turning it from side to side like whatever was in there was sliding from side to side. Opened up the back panel and saw all these tiny black pieces. Have narrowed it down to these being disintegrating plastic retainers that slipped over the pointed ends of each individual bass button rod piece. As you can see in the pic, the button is attached ti a thin rod that attaches to a flat piece. The pointed end of the flat piece inserts in the frame and when new there was a black retainer band that was slipped over the point and that keeps the button from popping upward and disengaging. I need to replace all of them. Any suggestions? Are these retainers available. I see a repair someone did by just wrapping a piece of wire around it. Just need a tiny O ring or rubber bands. Need ALL of them replaced. Otherwise a really clean and nice accordion. You can see in a pic the debris from these as they have fallen apart. Thanks for the advice.
 

Attachments

  • IMG_2287.jpeg
    IMG_2287.jpeg
    273.8 KB · Views: 41
  • IMG_2288.jpeg
    IMG_2288.jpeg
    215.1 KB · Views: 41
Have a very nice condition Scandalli accordion. Working on the bass side. Buttons were all pushed in and I could hear light rattling when turning it from side to side like whatever was in there was sliding from side to side. Opened up the back panel and saw all these tiny black pieces. Have narrowed it down to these being disintegrating plastic retainers that slipped over the pointed ends of each individual bass button rod piece. As you can see in the pic, the button is attached ti a thin rod that attaches to a flat piece. The pointed end of the flat piece inserts in the frame and when new there was a black retainer band that was slipped over the point and that keeps the button from popping upward and disengaging. I need to replace all of them. Any suggestions? Are these retainers available. I see a repair someone did by just wrapping a piece of wire around it. Just need a tiny O ring or rubber bands. Need ALL of them replaced. Otherwise a really clean and nice accordion. You can see in a pic the debris from these as they have fallen apart. Thanks for the advice.
Tried some heat shrink. Looks like it will work.
 
If you decide to go with o-rings you can get them in a huge size range. I like nitrile o-rings, very tough, can stretch a lot, last forever. I buy kits in both metric and imperial dimensions (Amazon carries them), each contains a variety of sizes from tiny to large - the kits are great when I need one to fit but don’t know the exact size. Once the best size is determined you could order in bulk from a local industrial supplier (in most cities) or online. Might even stack two if needed for the best thickness.
(I use these mostly for fluid/gas pressure repairs, not yet for a musical instrument!)
 
Have a very nice condition Scandalli accordion. Working on the bass side. Buttons were all pushed in and I could hear light rattling when turning it from side to side like whatever was in there was sliding from side to side. Opened up the back panel and saw all these tiny black pieces. Have narrowed it down to these being disintegrating plastic retainers that slipped over the pointed ends of each individual bass button rod piece. As you can see in the pic, the button is attached ti a thin rod that attaches to a flat piece. The pointed end of the flat piece inserts in the frame and when new there was a black retainer band that was slipped over the point and that keeps the button from popping upward and disengaging. I need to replace all of them. Any suggestions? Are these retainers available. I see a repair someone did by just wrapping a piece of wire around it. Just need a tiny O ring or rubber bands. Need ALL of them replaced. Otherwise a really clean and nice accordion. You can see in a pic the debris from these as they have fallen apart. Thanks for the advice.
I can confirm, mine has the same type of mechanism, with the same problem. I fixed it with thin shrink tubes (just enough thick to get past the lower side with that kind of hooks) cut to the right size and heat-shrinked into place. The brittle pieces you found inside are indeed from the old retainers, which look to me to be also some sort of shrink tubing or something but from that past era. First, i have done at my accordion just the damaged ones. Then, other ones broke and again buttons fell inside or got loose until, at the third try i pinched the pieces harder with needle pliers and broke intentionally everything brittle off and changed all of them. No more problems have arisen since then.
 
Interesting.
Out of curiosity since you did them all- did you push all the top layer rows (the diminished, 7th, minor, major button rows out) to access the lower level ones? Then push them back back in place and do them row by row? I hope this makes sense.
I’m thinking of finally trying this. I’ve got a butterfly model with this system and it got pushed to the side for some other accordion projects. Now I’m back to maybe trying this. I’m thinking of putting the shrink tube around them snd maybe heating with a soldering tip to shrink it.
Let me know what you think of my plan here and if that’s essentially what you did. I think you really have to do them all like you ended up doing since they disintegrate so easily.
Thanks
 
It means the assembly with the chord buttons comes out making it easier to access the pistons of the 2 bass rows. These may need a slighly wider diameter ring.
 
Interesting.
Out of curiosity since you did them all- did you push all the top layer rows (the diminished, 7th, minor, major button rows out) to access the lower level ones? Then push them back back in place and do them row by row? I hope this makes sense.
I’m thinking of finally trying this. I’ve got a butterfly model with this system and it got pushed to the side for some other accordion projects. Now I’m back to maybe trying this. I’m thinking of putting the shrink tube around them snd maybe heating with a soldering tip to shrink it.
Let me know what you think of my plan here and if that’s essentially what you did. I think you really have to do them all like you ended up doing since they disintegrate so easily.
Thanks
I did the bass rows with long thin needle nose pliers.
 
Interesting.
Out of curiosity since you did them all- did you push all the top layer rows (the diminished, 7th, minor, major button rows out) to access the lower level ones? Then push them back back in place and do them row by row? I hope this makes sense.
I’m thinking of finally trying this. I’ve got a butterfly model with this system and it got pushed to the side for some other accordion projects. Now I’m back to maybe trying this. I’m thinking of putting the shrink tube around them snd maybe heating with a soldering tip to shrink it.
Let me know what you think of my plan here and if that’s essentially what you did. I think you really have to do them all like you ended up doing since they disintegrate so easily.
Thanks
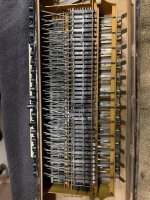
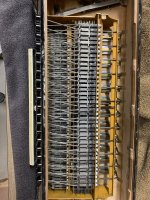
It's kind of what i did, except for pushing out any row, i didn't risk doing that, as the slats have those shoulders that press the wires that actuate the rods, and once those get escaped, it would have been a culprit to put them back. I looked at each slat at what rod it was connected to and pushed with one hand the button all the way in (this giving me full access to the row behind the rear one), and with the other, i pulled with the pliers if the retainer broke, i then let the pliers be, grabbed a pre-cut piece of retractible tube and inserted it by hand, then with a sort of "anti-wind lighter" with a long nose (that's in direct translation of what they call them here, but i guess you get the idea it's the one with sturdy flame and with a tube, like those barbecue ones) i just gave a quick pulse and the tube shrunk. The 7'ths and diminished ones i found the easiest to do because i could reach by hand to insert the tube as they are the exterior row. You will find there on those rows also the minor chord buttons if i remember correctly. The idea is to look at what button presses what slat and pressing that one affected.
The soldering iron might just be to thick to get into the first 3 rows with it. Those first 3 are some sort of harder to do. For them i used a bent-tip tweezer, i pinched and pushed the pieces, quite hard, and what felt to be soft i left, and all the brittle ones broke. Then i placed the piece of shrink tube on the tip of the tweezer, half in and half free so i could insert it over the "hooks" of the slat, depressed the button just about half, and from a side row (for example for button C major, i inserted the tweezer on its side from between the rows corresponding to D major), then i tried to get the tube over one "hook" of the slat, then worked my way with it around the other. For this you definitely need the bent tip tweezer. First tries you might be losing or deteriorating the shrink tube, but pretty fast you'll see you'll get used to the technique and then it will seem child's play.
Important thing is to keep each button you're working on depressed, more or less according the space of work you need. Otherwise, while trying to insert the retractible tube, the button will push itself outside.
I recommend doing everything brittle at once, because if not, you will find some new buttons getting out or falling in while you play, and having to open it up again. As you know, one button can depress more ones at the same time so chances are high something keeps falling and interrupting your play.

But the job is worth doing, because it involves little to none investment and it saves your instrument. In my case, some were redone before and the retainers were still really soft (around 20-no more than 30) those i left as they were. But some were badly repaired (weird materials used) and all brittle ones were redone. I kind of pinched them a bit harder one by one, so what had in mind to break, to just break and redo.
 
Last edited:
Well I finally completed it. The bass and counter bass row took the most time. And I did like you said and used larger tweezers and left everything in place. This was the way to do it.
Definitely a different design than most other accordions but seems pretty good. I still have to wax the reeds back in place on the blocks since they were all loose. And then can see how it all works!
Thanks to everyone for helping me. This was definitely new to me.
 

Attachments

  • IMG_4453.jpeg
    IMG_4453.jpeg
    489.7 KB · Views: 13
  • IMG_4454.jpeg
    IMG_4454.jpeg
    519.5 KB · Views: 12
Looks like I need to bookmark this thread.
My 50's Scandalli doesn't have this issue yet but it's only a matter of time:

2 Back a.jpg

But the one thing you haven't mentioned is what size tubing did you use ?
 
I bought a mixed bag at harbor freight for a couple dollars. The white one, smallest in there, was what i used. I’m not sure of the exact size. Essentially it just needs it to fit over the end snd then I heated with a soldier tip. It only has to shrink enough so it will stay on. I think it’s good for a long time. My first pic shows sone of the old black ones that just chip right off they were so dried out.
Glug- yours look pretty nice! Mine were super brittle and just falling apart to the touch.
 
Well I finally completed it. The bass and counter bass row took the most time. And I did like you said and used larger tweezers and left everything in place. This was the way to do it.
Definitely a different design than most other accordions but seems pretty good. I still have to wax the reeds back in place on the blocks since they were all loose. And then can see how it all works!
Thanks to everyone for helping me. This was definitely new to me.
I am grateful that the advice was of help and i am really happy that you managed to save the accordion.
Yes, the bass/counter bass are a bit harder to do, but once done you can enjoy the instrument again for a long time.

Indeed, it is a specific design, but personally, i like it. other than those retractables getting brittle (but at the same time a manageable issue), it seems to be a sturdy, very low-clacking mechanism.

I just remembered, just in case someone needs this tip also, you can interchange some of the bass buttons, your's is not the case according to the photo, but mine had especially the G, G, D, E basses/counters platbands so used up, i had to interchange with some with the same type of rod bend but actuating other keys, so, for example: if the used up platband window was the lower one, i interchanged with a button that actuated an upper window and had an unused lower one, and vice versa and so on to all used ones, so that all got again at almost factory free play. (my old Scandalli is now almost 90 years old but i'm just sticking to it and won't let it go)

I have also to check the wax and condition of the reeds in my old Scandalli. I admit i'm somewhat nervous looking ahead to this as it's my first, but i documented myself around here and on youtube and it seems to be also pretty easily manageable. I had to do the buttons issues as an "emergency" as i received the instrument with this issue, it was just before christmas and i wanted to post some carols on FB :D and buttons just kept falling in.
 
Last edited:
Looks like I need to bookmark this thread.
My 50's Scandalli doesn't have this issue yet but it's only a matter of time:

2 Back a.jpg

But the one thing you haven't mentioned is what size tubing did you use ?
My other one, Polifonico (or as most commonly known - brevetto, the one with saxophone caps, from 60's) has the same mechanism, and as yours, it might be just a matter of time before having to get my nose into it either. :)

I looked up and the tubes i used are 3,5 mm thick. Lengthwise you have to cut them up manually +/- to what you estimate them to be.

I had a whole bunch of them, a set bought from Lidl in all various diameters. But they have to be available at any brico stores
 
Glug- yours look pretty nice! Mine were super brittle and just falling apart to the touch.
The same were mine on the old Scandalli. The newer ones (on the polifonico) seem to be still ok, but the old ones, just broke away at the slightest touch
 
Back
Top