• If you haven't done so already, please add a location to your profile. This helps when people are trying to assist you, suggest resources, etc. Thanks
  • We're having a little contest, running until 15th May. Please feel free to enter - see the thread in the "I Did That" section of the forum. Don't be shy, have a go!

Just thinking about accordion bright work.

Dingo40

Been here for ages!
Joined
Nov 27, 2017
Messages
4,798
Reaction score
4,659
Location
South Australia
Many accordions feature bits of bright-work ( logos, decorative items) which on casual inspection appear to be chromed metal but turn out to be "chromed " plastic.
Much of this surface "chromed finish "
often degrades over time and becomes shoddy, spoiling the cosmetic appearance of the instrument.
While watching an episode of "Wheeler Dealers, "I became aware that, nowadays, there has become available a variety of products that can be sprayed on or applied with a felt pen which closely mimic chrome plating, such as this, for one:
Hmm, just a thought 🤔🙂
 
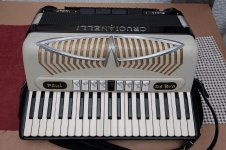
Nothing beats the real thing of course, but to improve the appearance of an old accordion with "shoddy" decorations, a chrome or silver spray paint certainly does a better job than doing nothing at all. But... this only works well on decorative items you can easily remove. My old Crucianelli for instance has metal decorations that you can remove and reattach (without glue) but it also has chrome-plated letters you cannot remove, and for those a felt pen or brush might work better.
The first picture shows the Crucianelli before my attempts. You can see that the ornaments are a type of brass or copper and the chrome-plating has worn off.
The second picture shows the result of my spray-paint job (after reattaching the ornaments). I'd like more "shine" but this is as good as it gets with just spray paint. Any suggestions as to how to further improve this are very welcome!
You may notice that some of the knobs of the broken mic system were also missing and I came up with a "cover" for that as well...

P5221428.jpg
PA011664.jpg
That's really pretty. Your name is tasteful too. Congrats on that one!
 
Nothing beats the real thing of course, but to improve the appearance of an old accordion with "shoddy" decorations, a chrome or silver spray paint certainly does a better job than doing nothing at all. But... this only works well on decorative items you can easily remove. My old Crucianelli for instance has metal decorations that you can remove and reattach (without glue) but it also has chrome-plated letters you cannot remove, and for those a felt pen or brush might work better.
The first picture shows the Crucianelli before my attempts. You can see that the ornaments are a type of brass or copper and the chrome-plating has worn off.
The second picture shows the result of my spray-paint job (after reattaching the ornaments). I'd like more "shine" but this is as good as it gets with just spray paint. Any suggestions as to how to further improve this are very welcome!
You may notice that some of the knobs of the broken mic system were also missing and I came up with a "cover" for that as well...

P5221428.jpg
PA011664.jpg
How did you make those name plates where the mic knobs used to be (particularly the lettering)? They look great.
 
Using a paint based solution; be it oil, enamel, or alcohol, is not going to match polished metal- ie; chrome. It can blend in OK from a distance but will clearly not fool anyone- not even a full-of-pride-look-what-I-just-did putzer. I have spent enough time on this issue to easily qualify for that badge.

Proper preparation of the surface- in terms of having it scratch and pit free- is pretty much required. The best solution in terms of looking closest (still no cigar but closer) are the alcohol based markers. Despite their optimistic "mirror finish" labeling they just aren't. They are also second worst at showing any flaws through the covered area. The assorted paints can do OK and cover better as they are thicker- but by and large also look less realistic as they get thicker. One solution that both covers and can work cosmetically is an acrylic/enamel based glitter paint in silver.

Absolutely has to be done over a complete segment since it is not at all a reflective finish but it blends in well with most schemes, "hides a lot of sins" and with a clear "dishwasher safe" coat of clear enamel it becomes pretty durable ("Folkart" on Amazon makes both suitable paint and clear coat). I'm sure there are many others.) Goes on with a brush and is pretty easy to do in multiple coats without having any brushmarks. Again, looks nice but is clearly a different finish than the original polished surfaces.

Works great on the large "whatever the heck they are" (the name eludes me at the moment?) polished mute cups/sordinos as found on older Scandalli/Frontalini/Dallape et all. The things seem to have the plating worn through with consequent corrosion on a pretty regular basis.

Note that the alcohol based "chrome" markers are second best. The best is achievable -with a fair amount of elbow grease- using a home electroplating kit. Caswell comes to mind but there are surely others. This requires the patience of Job, the wisdom of Solomon, and if you take shortcuts in prep it'll look like sin or just not work. You'll also want to wear rubber gloves while doing it. It is best with metal though there are allegations that it can be done somehow on plastics. I have no experience with the plastic based kits and I like to give the sales departments the benefit of the doubt but have a hard time envisioning electroplating on a non conductive substrate.

Mr. DeBra hit it on the head when he mentioned detaching the trim bits if at all possible to redo them. That done, they are a lot easier to prep for refinishing (pretty much flat undoable if you're trying to electroplate). If you prep well and paint the whole piece so there's no treated/untreated glaring break it can come out quite well- as in the redone example shown above. With a less shiny accent piece it may well be taken as neither worse nor better- just different with the value of the effect in the eyes of the beholders. If you wind up only doing part of the piece choose your break point carefully and use masking tape which you pull off immediately after painting to avoid a raised paint edge. For many larger edging pieces pretty good results for painting in situ can be achieved with masking tape and patience. The more and smaller radius the curves the harder.

If I can ever choke the cell phone with camera out of my daughter again (smartphoneless dinosaur myself) I'll post some pix of the various results of different methods- but I figure it's pretty straightforward even without pictures.


PS My apologies as always for terrible proofing.
 
Last edited:
Late to the party... Just come across this thread. I'll be wondering what to do, eventually, as I get further on with the restoration of my Scandalli 'wreck', buggered mute flaps and all...

Just a note re. henry d's post, above. " It is best with metal though there are allegations that it can be done somehow on plastics. I have no experience with the plastic based kits and I like to give the sales departments the benefit of the doubt but have a hard time envisioning electroplating on a non conductive substrate."

Electroplating on non-conducting bases (eg plastics) is fairly mature technology. It relies on making the base's surface conductive, or adding a conductive layer. Adhesion of the plating relies on the bond between the conductive surface and the underlying base material. That's where the cleverness lies...

I can't really understand how the Italians managed to produce such terrible plating. Chromium plating is much more tricky than nickel plating: I suspect most of the brightwork is nickel plate - just badly done. Things can be re-plated...
 
Great info, Henry d
Using a paint based solution; be it oil, enamel, or alcohol, is not going to match polished metal- ie; chrome. It can blend in OK from a distance but will clearly not fool anyone- not even a full-of-pride-look-what-I-just-did putzer. I have spent enough time on this issue to easily qualify for that badge.

Proper preparation of the surface- in terms of having it scratch and pit free- is pretty much required. The best solution in terms of looking closest (still no cigar but closer) are the alcohol based markers. Despite their optimistic "mirror finish" labeling they just aren't. They are also second worst at showing any flaws through the covered area. The assorted paints can do OK and cover better as they are thicker- but by and large also look less realistic as they get thicker. One solution that both covers and can work cosmetically is an acrylic/enamel based glitter paint in silver.

Absolutely has to be done over a complete segment since it is not at all a reflective finish but it blends in well with most schemes, "hides a lot of sins" and with a clear "dishwasher safe" coat of clear enamel it becomes pretty durable ("Folkart" on Amazon makes both suitable paint and clear coat). I'm sure there are many others.) Goes on with a brush and is pretty easy to do in multiple coats without having any brushmarks. Again, looks nice but is clearly a different finish than the original polished surfaces.

Works great on the large "whatever the heck they are" (the name eludes me at the moment?) polished mute cups/sordinos as found on older Scandalli/Frontalini/Dallape et all. The things seem to have the plating worn through with consequent corrosion on a pretty regular basis.

Note that the alcohol based "chrome" markers are second best. The best is achievable -with a fair amount of elbow grease- using a home electroplating kit. Caswell comes to mind but there are surely others. This requires the patience of Job, the wisdom of Solomon, and if you take shortcuts in prep it'll look like sin or just not work. You'll also want to wear rubber gloves while doing it. It is best with metal though there are allegations that it can be done somehow on plastics. I have no experience with the plastic based kits and I like to give the sales departments the benefit of the doubt but have a hard time envisioning electroplating on a non conductive substrate.

Mr. DeBra hit it on the head when he mentioned detaching the trim bits if at all possible to redo them. That done, they are a lot easier to prep for refinishing (pretty much flat undoable if you're trying to electroplate). If you prep well and paint the whole piece so there's no treated/untreated glaring break it can come out quite well- as in the redone example shown above. With a less shiny accent piece it may well be taken as neither worse nor better- just different with the value of the effect in the eyes of the beholders. If you wind up only doing part of the piece choose your break point carefully and use masking tape which you pull off immediately after painting to avoid a raised paint edge. For many larger edging pieces pretty good results for painting in situ can be achieved with masking tape and patience. The more and smaller radius the curves the harder.

If I can ever choke the cell phone with camera out of my daughter again (smartphoneless dinosaur myself) I'll post some pix of the various results of different methods- but I figure it's pretty straightforward even without pictures.


PS My apologies as always for terrible proofing.
Great info, Henry D. Thank you !
 
Back
Top