must keep busy in those partial lockdowns


")


Thanks Jerry,
Here's more about it:?
Happy playing, Jozz!??
Thanks Jerry,
Here's more about it:?
Happy playing, Jozz!??


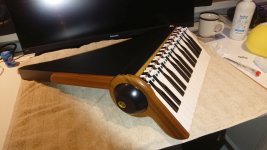
Just by the inside colour my completely uneducated guess would be mahogany.Before
After
Next: the chipped wood at the top...
I guess I have to glue in a piece. Any tips on what kind of wood these endcaps are made of?
That video of Rory's shows the caps a tad darker than mine. I suppose this is either stained or different kind of wood. Mine don't look really stained, as the cutting surfaces of the milling on the inside, and the inside of the broken off bit, is much the same color as the outside.
Method book? (I don't speak German.)Claviola spielen Das neue Blasinstrument für Jedermann. Anleitung für das Spiel | eBay
Find many great new & used options and get the best deals for Claviola spielen Das neue Blasinstrument für Jedermann. Anleitung für das Spiel at the best online prices at eBay! Free shipping for many products!www.ebay.com
my guess too, although i thought about stained douglas fir as well, because of the pink en the contrasting line patternJust by the inside colour my completely uneducated guess would be mahogany.
Another one.