• If you haven't done so already, please add a location to your profile. This helps when people are trying to assist you, suggest resources, etc. Thanks
  • We're having a little contest, running until 15th May. Please feel free to enter - see the thread in the "I Did That" section of the forum. Don't be shy, have a go!

Replacing reed leathers - new leather already curling??

AlicePalace

Member
Joined
Dec 5, 2022
Messages
70
Reaction score
79
Location
Massachusetts, USA
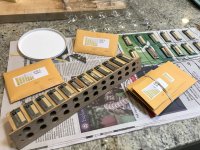
Now that we’re having some rainy, fall weather, I’m finally getting around to replacing the leathers on the ”repair-practice” beater accordion that I grabbed for $20 a few months ago. I have removed all of the reeds from the higher of the two bass blocks (because I will also be practicing waxing them back on), removed the old wax, removed most of the old leathers (I left the ones that aren’t curled or coming off), and have carefully cut (guillotined with a razor) and glued the replacement leathers.

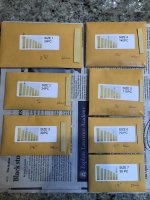
I‘ve just started placing the reeds back in the block, and I notice that there are some new leathers that are already so badly curled they’re completely unacceptable. What the …?? Is it because the leather is too thin for the length (the one in the pic is ~28mm)? I bought a set of 7 sizes and cut to the same length as the old leathers, using the closest size in the set regardless of the thickness of the leather — generally used sizes 5, 6 and 7 because those were the closest lengths, but the leather is much thinner than the original. Should I instead have been trying to match both length and thickness? Width is also a bit different in many cases. Should I have been cutting to the same width as well? Or perhaps do I need to put glue further down the length of the leather? I estimate I put the glue about 6-7mm down the length.

I don’t want to wax these in until I understand how to make this right. Thank you!
 

Attachments

  • IMG_2252.jpeg
    IMG_2252.jpeg
    399.9 KB · Views: 36
  • IMG_4287.jpeg
    IMG_4287.jpeg
    338.7 KB · Views: 36
  • IMG_4282.jpeg
    IMG_4282.jpeg
    308.2 KB · Views: 36
I usually try building memory in them by curling them the opposite way before glueing them. I also find it very handy to have a tuning bellows I can operate the reed on to make sure the leather is behaving and make adjustments before putting back in the instrument.
 
I usually try building memory in them by curling them the opposite way before glueing them. I also find it very handy to have a tuning bellows I can operate the reed on to make sure the leather is behaving and make adjustments before putting back in the instrument.
Huh, I didn’t realize you could test an individual reed on a tuning bellows. That makes sense, although I don’t have a true tuning bellows at this point so can’t do that. I will have to try the “building memory” trick as I practice repairs to see if that’ll work here. I suspect the leather is just too flimsy, though, for this length. (See, this is why I’m practicing on the beater and not on the one I *really* want/need to restore!)
 
Huh, I didn’t realize you could test an individual reed on a tuning bellows.
I should clarify. I wax them back into the reed box before testing on the bellows. If I have to unwax to fix something it’s the nature of the task. There are tuning tables to run reeds out of the box but they are rare.
 
What you should do with a new leather is roll it up, then unroll it and press it flat. It should stay more or less flat but if needed can be further straightened using pincers or by means of stroking it with the edge of a pinger (or the blunt edge of a small kitchen knife). When you are satisfied with the flat shape you then glue the leather onto the reed plate with a small drop of glue, using the "square rule": the area that is glued should be about as long as the leather is wide. (Many people glue too far up along the length of the leather.) Then you add the booster spring (and glue the paper disk. When the booster spring is just one or two mm shorter than the leather itself it likely has the right strength for the valve. (The thicker old valves you had may not have had booster springs?) Put a small upward kink in the last mm of the booster (using pincers) so that the end cannot "catch" on the leather as it is pushed open while playing. Another very slight kink (down) near the base of the booster spring ensures the spring provides a little bit of force to keep the leather pushed own all the way when the note doesn't play. You later have to "play" with the spring strength to ensure the frequency of the note is stable from pianissimo right up to fortissimo. Sounds complicated but it becomes routine. For the highest eight to ten notes that still get a valve (3 to 5 on each block), use plastic valves. They work better than leather that becomes a bit unpredictable in the smallest size.
If you thought that replacing valves was easy, think again. It is very easy when afterwords you only want to play mezzo-forte to forte, but not if you want the note to also sound right in pianissimo to mezzo-piano.
 
There is that trick with the paper clip that is bent in such a way (bit of an S-shape) so that it can flatten installed leathers? :)
 
What you should do with a new leather is roll it up, then unroll it and press it flat. It should stay more or less flat but if needed can be further straightened using pincers or by means of stroking it with the edge of a pinger (or the blunt edge of a small kitchen knife). When you are satisfied with the flat shape you then glue the leather onto the reed plate with a small drop of glue, using the "square rule": the area that is glued should be about as long as the leather is wide. (Many people glue too far up along the length of the leather.) Then you add the booster spring (and glue the paper disk. When the booster spring is just one or two mm shorter than the leather itself it likely has the right strength for the valve. (The thicker old valves you had may not have had booster springs?) Put a small upward kink in the last mm of the booster (using pincers) so that the end cannot "catch" on the leather as it is pushed open while playing. Another very slight kink (down) near the base of the booster spring ensures the spring provides a little bit of force to keep the leather pushed own all the way when the note doesn't play. You later have to "play" with the spring strength to ensure the frequency of the note is stable from pianissimo right up to fortissimo. Sounds complicated but it becomes routine. For the highest eight to ten notes that still get a valve (3 to 5 on each block), use plastic valves. They work better than leather that becomes a bit unpredictable in the smallest size.
If you thought that replacing valves was easy, think again. It is very easy when afterwords you only want to play mezzo-forte to forte, but not if you want the note to also sound right in pianissimo to mezzo-piano.
Thanks for this excellent description, Paul. I especially appreciate your mention of the “square rule.” That is helpful. I had read others saying to take note of how far up the glue had been placed on the old valve and attempting to replicate that on the new valve, but boy that’s difficult to do unless perhaps you’re just doing a single reed.

This particular block does not have any booster springs. In fact, when I was making the post I had to double-check that it was a bass block because the reeds are not particularly large — must be the highest of the bass registers. I’ve just checked the other bass block and there are no booster springs on it, either. So either someone repaired it and didn’t put booster springs on, or it was originally manufactured that way. For what it’s worth, this is a very old Hohner Carmen.

At any rate, I certainly won’t get any experience with booster springs on this model unless I decide I should. I am starting to wonder if I should take a crack at salvaging the old leathers, just for the experience of it. They are substantially thicker than the new ones and I’m guessing they’d perform better.

You are right, this is turning out to be trickier than I had imagined. Good thing this is just a repair-practice instrument!
 
You are right, this is turning out to be trickier than I had imagined. Good thing this is just a repair-practice instrument!

 
Regarding plastic valves, even a manufacturer like Victoria that used to put all leather valves in their (higher-end) accordions has changed to using plastic valves for the highest notes that still have valves. Very small and thin leather valves are just too unpredictable whereas small plastic valves are very predictable, especially over a longer time period.
 
i will defer to your more precise knowledge, of course,
i mainly put the link to the old conversation as it later
describes the lexol refreshing method and since Alice
wants to perhaps revisit her old leathers i linked it here

thought i was just pasting the url for that thread, but yes the
visible part is me not wanting any steenkin' plastic flappy things !
 
Huh, I didn’t realize you could test an individual reed on a tuning bellows. That makes sense, although I don’t have a true tuning bellows at this point
Hello AlicePalace,

I’m a rank beginner with accordions, learning to play, but discovered I have a keen interest in repair, adjusting, and tuning and plan to pursue that - with my harmonicas too. (I have experience repairing and rebuilding other instruments.) I’ve was given an accordion bellows in good condition and plan to soon make a tuning/test bellows.

I watched one video where the reed plate was simply held tight by hand against the reed block (instead of first rewaxing) for testing on the test bellows. There seem be advantages to both methods but I lack experience. (I hope to gain more after recovering from shoulder surgery and have two functioning arms again! :) )

If you haven‘t seen it, this appears to be a good resource I learned about it from this forum. (I’ve read every word, some more than twice) It covers nearly all aspects including leathers. My local accordion repair mentor is also quite helpful.


Hey, where did you buy leathers?

JKJ
 
AlicePalace:
I'm sure there's an explanation but the way the new, leather valves you purchased were packaged and labeled is confusing (to me); is Size 1, 2 , 3 etc. referring to thickness of the leather or the width? Because leather is a natural material it is not consistent in its qualities and there is therefor a skill required in selecting the right valve. I hope somebody can explain the way your leather valves have been packaged/labeled and how the correct valve can be selected, or at least the choice narrowed down. It's unhelpful at this stage to talk about building memory into the valves, or rolling/shaping them as these are processes which are only required on used/tired valves and not new ones.
 
AlicePalace: I had expected by this time that those with more experience of leather valves would have offered some advice about those you recently purchased.
This is my further tuppenceworth. Your valve supplier may have bought/imported a bulk amount of unsorted leather valves, all mixed up, and he has attempted to sort them into what he considers to be useful sizes and amounts. As I explained earlier I don’t understand how he has chosen the packets he has and this was a question I had hoped somebody would answer.
My local supplier sells leather valves and he offers his selections based mostly on length. It is then up to the experience of the repairer to choose the best valve in that range of lengths to obtain the best performance.
I can’t see from the picture you supplied of the reeds ‘sorted’ into Pack 1, 2, 3 etc. what their differences are but it might help if you sort the valves yourself by length and start from there.
The valves in the bass end, especially the larger ones, can present problems to repairers. Some of those are just too big to function properly without spring assisters. I don’t know if that might be the problem in the photo you show where the interior valve has ‘fallen’.
 
An additional note: you mentioned that the new valves are thin and flimsy, whereas the old valves were not. With the flimsy thin valves you definitely need booster springs. If you use somewhat thicker valves they might just have enough "spring" in them to not need booster springs.
Don't worry if the valves don't stay flush completely when you hold the reed block such that gravity pulls the valves open. You should always store the accordion in its playing orientation unless the valves stay completely vertical when the accordion is on its feet. (That means no cassotto, also no Winkelbaß, and fairly straight reed block walls, thus not a strong trapezoidal shape that causes the reed plates to lean).
 
I just take a screwdriver and use the round chromed shaft and roll and very lightly pull the old leather valve over it while pressing it with my thumb. It rolls a nice curvature into the leather. This is if the old leather is still pliable. I do this with old units I’m trying to get playing again with nominal investment. So far I have had good success and I have worked on some very old units where the leather may be curled, but was still soft and pliable.
 
Back
Top