• If you haven't done so already, please add a location to your profile. This helps when people are trying to assist you, suggest resources, etc. Thanks (Click the "X" to the top right of this message to disable it)

How do I repair a stripped screw on a reed plate?

Joined
Apr 7, 2025
Messages
23
Reaction score
14
Location
Washington, USA
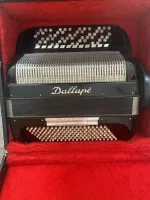
I just acquired a well-used Dallape Organtone six-row, B-system accordion that has definite signs of being dropped in its 50+ year past. It was a pretty inexpensive purchase, so I'd like to try to do some of the repairs myself and if they fail, I can send it to a specialist to do a proper job.

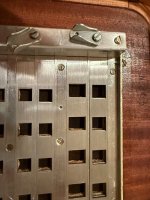
Here is an issue I discovered that I think is making the bellows very inefficient at the moment. I removed the bass reed blocks from the plate they were pressed against and I removed the felted plate that keeps the register sliders in place, which gave me access to the screws that hold the base reed plate to the wood. One of the corner screws is missing and the hole is stripped (when I tried to screw in one of the other identical screws into that hole it just spun). There is a clear 1-2mm gap between that corner of the plate and the wood and I can push the corner down but it springs back up with or without the screw there. Seems like the obvious answer is to get a *slightly* larger diameter screw, but it's also obvious this has been an issue in the past because there are clear signs of work being done on this very hole: the metal around it is all scratched up from previous attempts at removing it. See the attached photos:
 

Attachments

  • s-l960.webp
    s-l960.webp
    157.8 KB · Views: 25
  • IMG_1276.jpeg
    IMG_1276.jpeg
    329.8 KB · Views: 25
  • screw-gif.gif
    screw-gif.gif
    901.2 KB · Views: 25
One of the corner screws is missing and the hole is stripped (when I tried to screw in one of the other identical screws into that hole it just spun).
This is a fairly common problem with wood screws.
A trick that works for me is to dip matchsticks (or flat toothpicks) in some PVA wood glue and pack them into the hole. After drying (preferably overnight), trim the excess wood level with the surface using a sharp tool.
Then, pre drill the hole to take the screw.
I find the right sized drill bit by trying the screw against the slots that the bits sit in in their box: the next smaller bit than the one that accepts the screw (or for a really tight fit, the one below that) Is usually the one. But be careful not to split the wood by using too small a bit for making the hole .
Bob's your uncle!🙂
(Older, cone shaped wood screws with a smooth fat conical section to the shank (slotted heads) may need a slightly larger entrance to the hole to take the shank without splitting the wood.
How thick is the wood where the hole is?
Good luck with it!🙂
 
Last edited:
If the tricks mentioned here fail (I don't see why they would, but still...) You could make a small bracket that goes from the bolt just above the screw (in the second picture) with two 90 degree angles down to the wood, and then fix it with a new screw into the wood.
 
Can't be repaired, mate. That Dallape is no good for you.
Send it to me and I will dispose of it for you safely, in line with all the health & safety rules & regulations on disposing old Dallapes. ;)
I can't tell if this response means you don't like old Dallapes OR you DO like old Dallapes and this is a trick into getting one from me! 🤔
 
This is a fairly common problem with wood screws.
A trick that works for me is to dip matchsticks (or flat toothpicks) in some PVA wood glue and pack them into the hole. After drying (preferably overnight), trim the excess wood level with the surface using a sharp tool.
Then, pre drill the hole to take the screw.
I find the right sized drill bit by trying the screw against the slots that the bits sit in in their box: the next smaller bit than the one that accepts the screw (or for a really tight fit, the one below that) Is usually the one. But be careful not to split the wood by using too small a bit for making the hole .
Bob's your uncle!🙂
(Older, cone shaped wood screws with a smooth fat conical section to the shank (slotted heads) may need a slightly larger entrance to the hole to take the shank without splitting the wood.
How thick is the wood where the hole is?
Good luck with it!🙂
I'm not too sure about the thickness of the wood - it's whatever the foundation plate is screwed into. My guess is it's pretty thin. In order to do as you suggest, I would need to remove the foundation plate, right? That seems like a dangerous proposition... anything with twelve screws isn't meant to be removed without caution! I mean all the register sliders and control arms that link them to the switches would have to be uninstalled, wouldn't they?
 
If the tricks mentioned here fail (I don't see why they would, but still...) You could make a small bracket that goes from the bolt just above the screw (in the second picture) with two 90 degree angles down to the wood, and then fix it with a new screw into the wood.
Can I do the trick @Dingo40 suggests without having to remove the foundation plate?
 
I'm not too sure about the thickness of the wood -
Try to estimate the depth of the existing hole using a suitable piece of wire with a short "hook" on the end of it: the deeper the hole (= the thicker the wood) the better)
In order to do as you suggest, I would need to remove the foundation plate, right?
No: no need to remove anything. You're simply packing out the old hole "in situ", providing there's enough thickness to pack.
If not, you can try Paul Debra's suggestion!🤔
If neither suggestion works out, there should be a suitable accordion technician in Washington who can fix it without having to take it completely apart.🙂
There are also products such as these for building up the existing hole in thinner material:
 
Last edited:
Since the screw hole is stripped, a slightly larger screw might work, but be careful—forcing it could damage the wood further. Another option is filling the hole with a wood toothpick and glue, letting it dry, then reinserting the original screw. If that doesn’t hold, a small wooden dowel or threaded insert could reinforce it. Since the plate is warping, check if the wood underneath is cracked or swollen. If DIY fixes fail, a pro can properly repair or reinforce the area.
 
UPDATE: the glue held and the new screw is in place! I have yet to put the beast back together to check compression.

UPDATE II: Bob is in fact my uncle. The compression is a lot better now that the foundation plate is firmly attached to the wood! It's still not perfect, though I suspect the reeds and leathers to be the culprit of any further air loss. Thank you all for your help!
 
Last edited:
Back
Top