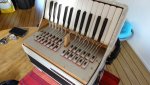
Been away for a while, but now back on track with some progress on this project:
- my Concerto has been sold so now Im aiming for this thing to be my main live performer
- the Unisella has been rewaxed, revalved and retuned to a tighter tremolo than German, more suitable for Irish (or so I hope)
What I noticed right away was how the basses are influencing the treble notes, sort of causing vibrations but well see if that is a real bother or not.
Pallets and action seem good so I leave that for the time being, first put some miles on it.
New grille cloth
It was ugly and dirty so I replaced it with a black/silver party stocking of my better half. The old one I could carefully tear off no problem, and I reattached the stocking with dilluted wood glue ( i had nothing else on hand).
Internal microphones
As this will be used in a band setting, internal microphones is a must. I was trying to solder a electet circuit together myself but gave that up as I kept on getting high signal to noise. I was determined not to buy a new expensive system so I went on searching for alternatives.
Eventuelly, I found this guy:
https://www.ebay.com/usr/midifisa
The prices fluctuate so I guess he changes them when the ads get older.
Anyway, i just went ahead and ordered the type for diatonics as this 26/32 is about those sizes. After a week or so I received the package. It came labeled and with spare wires (probably the stuff he had left after he was done).
There are no reviews anywhere of this product so here comes mine.
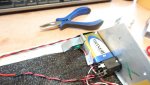
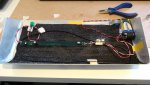
The system consists of 2 treble mics (the capsules are the standard two-pin variety, and one bass capsule which is about twice the size of the treble capsules. The 9V battery is attachable to a standard 9v wire hat which is soldered to the jackplug. It comes with a bellows cable and the necessary connectors are pre-soldered. For this reason you need to drill reasonable big holes in your soundboards to go through the bass side. I am using this treble only so I didnt do that.
The treble capsules are on a printboard strip with the necessary components to generate the signal. These are very small components (i dont know what exactly) not nearly as much resistors and stuff you find on the Musitech printboards. There is double sided tape attached to the back of the strips and also to the connectors for the bass side cabling.
There is no install guide, so you are on your own, which was fine for me. I used a battery drill, some pliers and screwdrivers, an assortment of tape. And bits and pieces I needed to place the 9V battery somewhere under the grille.
I measured for clearance inside and marked the drill holes, and took the plunge. It took about 2 hrs and I was don, but I didnt go through to the bass side, instead I used the bass capsule as a third capsule under the grille. This allows me to accurately place it later on, where it is most needed according to how it sounds in the mix with the full band.
Audio sample:
https://instaud.io/3xGc
First part: single notes (both pots are at 75%, no normalization or eq)
Second part: singles and thirds in the keys I will be mostly using (same settings)
Third part: pots at 100% and silence to check for signal to noise
Will go testing how it holds up on stage.