• If you haven't done so already, please add a location to your profile. This helps when people are trying to assist you, suggest resources, etc. Thanks
  • We're having a little contest, running until 15th May. Please feel free to enter - see the thread in the "I Did That" section of the forum. Don't be shy, have a go!

Re-valving a cba treble keyboard.

Status
Not open for further replies.

Pipemajor

Well-known member
Site Supporter
Joined
Apr 16, 2017
Messages
971
Reaction score
770
Location
London, Limousin, France
Hi all,
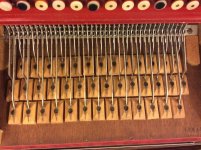
Having completed tuning my Maugein 80bass cba (well to my satisfaction anyway), I now would like to re valve as the keys are very noisy. It seems a very simple process on this little box but I am unsure as to how the valves are secured.
It looks like wax but, when I scrape it, it seems too hard for wax. I have enclosed a photo and the little black dots on each valve are leather dots, which I don't see the point of.
Any advice and assistance will be gratefully received. Thanks.Keyboard.JPG
 
Pipemajor,
I'm confused: I see pallets, not valves. What am I missing??
Are you wanting to re-face the pallets?
That's very different from re-valving the reeds!?
 
Last edited:
The pallets on this accordion appear to be rather thin. Replacing the pallets is only fairly straightforward when you use new pallets of the same thickness, but that may not help you enough in terms of noise reduction. Changing to thicker pallets makes the job a lot harder because you will need to at least remelt that wax on each pallet to get the angle right, but maybe also bend each lever/arm to keep the key travel the same.
 
Pipemajor,
I'm confused: I see pallets, not valves. What am I missing??
Are you wanting to re-face the pallets?
That's very different from re-valving the reeds!?
Apologies. I had looked on Accordion Revival for information and they called them valves. I meant pallets:rolleyes:
 
The pallets on this accordion appear to be rather thin. Replacing the pallets is only fairly straightforward when you use new pallets of the same thickness, but that may not help you enough in terms of noise reduction. Changing to thicker pallets makes the job a lot harder because you will need to at least remelt that wax on each pallet to get the angle right, but maybe also bend each lever/arm to keep the key travel the same.
Thanks for your reply Paul. The pallet lining is indeed very thin but they all seem to be attached firmly. I was thinking about putting another thin lining on top of the existing, which would also lower the key movement, which would be helpful.
My main concern is removing the pallets as they are very firmly attached and wonder if they may be glued on.
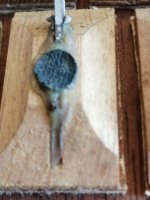
Ps. forget that. I've just taken a close up of one pallet and they are waxed on. The wax must be extremely old as it is like concrete.
Time to get the soldering iron out (or a hammer and chisel:eek:).
Thanks for your replies.Key.jpg
 
Apologies. I had looked on Accordion Revival for information and they called them valves. I meant pallets:rolleyes:
Well... the pallets are technically valves. Their function is that of a valve. But then, the leathers on the reed plates also function like valves. We need some way to distinguish the terms. In Italy they use "pelle" to indicate a valve, and "valvola" to indicate a pallet.
 
Thanks for your reply Paul. The pallet lining is indeed very thin but they all seem to be attached firmly. I was thinking about putting another thin lining on top of the existing, which would also lower the key movement, which would be helpful.
My main concern is removing the pallets as they are very firmly attached and wonder if they may be glued on.
Ps. forget that. I've just taken a close up of one pallet and they are waxed on. The wax must be extremely old as it is like concrete.
Time to get the soldering iron out (or a hammer and chisel:eek:).
Thanks for your replies.
That looks like glue indeed... If it is a rock-solid connection I suggest not to touch it!
The best way to approach the problem is to disassemble the keyboard first (keeping everything in order!) so that you have ample room to work on each pallet. I strongly suggest to remove the old "lining" which should be felt+leather but who knows what it is on this instrument... and replace it by new felt+leather, not too thick as you then need to bend all the levers (arms). New felt+leather in addition to what's already there would definitely make the new pallet too thick.
 
Thanks Paul. Well I've managed to remove one pallet and it was glued on.
I tried a soldering iron and the glue just bubbled and gave off a terrible smell.
I then used a junior hacksaw blade to cut through the glue on either side and it came out after that.
I think I'll carry on that way rather than disassembling the keyboard. It will take longer probably but time I have aplenty:).
The pallet surface looks clean but the leather seems very coarse, though soft. It is about 2mm total of the backing and leather.
For some reason I couldn't download the photos this time (invalid format) so I had to send them as attachments.
 

Attachments

  • Pallet -.pdf
    138.1 KB · Views: 9
  • Pallet2.pdf
    114.3 KB · Views: 5
Thanks Paul. Well I've managed to remove one pallet and it was glued on.
I tried a soldering iron and the glue just bubbled and gave off a terrible smell.
I then used a junior hacksaw blade to cut through the glue on either side and it came out after that.
I think I'll carry on that way rather than disassembling the keyboard. It will take longer probably but time I have aplenty:).
The pallet surface looks clean but the leather seems very coarse, though soft. It is about 2mm total of the backing and leather.
For some reason I couldn't download the photos this time (invalid format) so I had to send them as attachments.
Well, new pallet material should be better (and less noisy) than what you have, probably.
Also have a look at what's under the buttons to cushion the movement when you press a button.
 
Pipemajor, I wonder if acetone would help you. I'd suggest masking off the instrument body, since acetone melts celluloid. If you use a cotton swab and paint a bit of acetone on the tops of the pallets, leave it for a minute, and then wiggle the pallets, my guess is that they will come off much more easily.

I think removing the pallets (as you are) is a good way to go. It makes it easy to sand them flat before attaching new material, and you can glue the pallets directly to the felt/leather, then cut between them with a sharp blade, ensuring a custom fit for each pallet without wasting any material. And when you go to reattach them to the arms, the pressure of the arms will hold them flat against the fondo so they are guaranteed to form tight seals.
Thanks for the tip Gonk, I'll give it a try. Never thought of gluing the pallet to the leather, then cutting. Sounds like a plan (y) .
I've ordered the new leather/felt from Charlie, so I can get on with removing the rest while I wait for it to arrive.
Must search back posts to see what adhesive to use:unsure:
 
Well, new pallet material should be better (and less noisy) than what you have, probably.
Also have a look at what's under the buttons to cushion the movement when you press a button.
Thanks Paul, I've already checked under the buttons and the felt is fine. It's only when buttons are released quickly as in triplets, when some are noisier than others, obviously the ones which get the most use.
 
Thanks for the tip Gonk, I'll give it a try. Never thought of gluing the pallet to the leather, then cutting.
I'm probably being paranoid, but just in case -- glue to the felt, with the leather facing the fondo...
Must search back posts to see what adhesive to use:unsure:
I use "Aileen's tacky glue" which is a grabby pva. I put a very light coat on the pallet, then put the pallet on the felt. Once the whole row of pallets is down, nicely lined up, I weight them with a book and try not to think about them for a while. You don't want to put any glue directly onto the felt; it'll harden.
 
I'm probably being paranoid, but just in case -- glue to the felt, with the leather facing the fondo...

I use "Aileen's tacky glue" which is a grabby pva. I put a very light coat on the pallet, then put the pallet on the felt. Once the whole row of pallets is down, nicely lined up, I weight them with a book and try not to think about them for a while. You don't want to put any glue directly onto the felt; it'll harden.
Thanks Gonk, it's good to hear from someone who has done it before. I'll follow your advice once I've got the pallets unstuck.
It took me 3 hours yesterday to remove 4 pallets and they were the easiest ones to get to on the outside row, so I think I'm in for a long haul.
I tried acetone using an artists paintbrush but it had no effect on the glue, so I'm left with scraping it out with a hacksaw blade. :(
I'm beginning to believe that disassembly (and later reassembly) of the keyboard is a faster solution...
 
I'm beginning to believe that disassembly (and later reassembly) of the keyboard is a faster solution...
You're probably right Paul, but I thought that having to remove the old pallet material while still attached to the levers might cause additional problems. I think I'll persevere possibly using the soldering iron to soften the glue, then scraping it off with the hacksaw blade.
I'll get there in the end!!
 
Well I've finally removed all the pallets. It got quicker as I went along .
I've noticed that the pallet lift varies with each row, obviously the outer row lift higher than the innermost row as the arms are different lengths , ranging from 11mm lift on the outer row to 7mm on the inner row. When I removed the pallets I didn't think to check whether the felt/leather was thinner on the inner rows than the outer one and now I have taken all the old material from the pallets I have no way of checking.
Just wondering if there is an optimum clearance when a key is pressed and whether thinner pads should be fitted to the inner rows to compensate.
My new pads are 3mm and the old ones were about 2mm. I've temporarily fitted a new one to an outside row to check and the button height is lower which is good and gives good lift, but when I fit one to the innermost row the clearance seems to me to be rather small.
I wonder if I should be using thinner felt/leather on the inner row.
Any comments most welcome, thanks
 
When you fit the inner row, the low clearance is likely to be accompanied by the key sitting rather low, as you described in the outer row. If you gently bend the pallet arm back (best to use two pairs of pliers or torciferri to control the point of the bend) you should be able to get the inner and outer rows sitting at the same height, with enough pallet clearance for both to sound good.

If that doesn't give good results, my first inclination would be to sand down the inner pallets slightly, or deepen the groove in which the pallet arm sits, rather than decrease the material thickness.

My workflow is: revalve all pallets with the same (thicker) material, place pallets under arms, bend arms to put keys at the correct height, double-check alignment and flush seating of all pallets, glue pallets to arms.
 
Thanks Gonk, I think the inner row may have had deeper grooves in the pallets but unfortunately when I removed all the pallets, in my ignorance, I didn't think of keeping the rows of pallets separate, so they got all mixed up. I've just finished glueing the pallets back in, so I will soon find out if they play Ok or not. Incidentally , with the stepped keyboard, I notice that the inner row opens less than the outer row without the pallets fitted, which must exascerbate the problem even further.:unsure:
 
Status
Not open for further replies.
Back
Top